Create Your Own Magic with a Turkish Mosaic Lamp Kit: Complete Guide to Lamp Bases & Parts
Hey there, all you amazing mosaic lamp kit enthusiasts! Are you dreaming of crafting your very own sparkling, glowing Turkish-style lighting masterpiece? You know, one of those gorgeous lamps that just lights up a whole room with color and charm? Well, if that's your dream, then you've officially landed in the right place, because this post is your ultimate guide!
Imagine transforming tiny, colorful pieces of glass into a dazzling beacon of light – it's pure magic, and totally doable with the right guidance! We're here to help you every step of the way, from picking out the perfect mosaic lamp kit that suits your style, to easily assembling a sturdy mosaic lamp base that will beautifully support your creation.
We'll dive deep into exploring how to choose high-quality Turkish lamp parts and make sure you understand what goes into the best Turkish lamp kits. Our goal is to make your DIY project an absolute breeze, filled with fun and creativity, not frustration!
So, are you ready to literally light up your creativity and craft something truly unique and beautiful? Let's go – your amazing handmade mosaic lamp adventure begins now!
1. What Is a Mosaic Lamp Kit?
Alright, let's talk about what a mosaic lamp kit actually is! Imagine you've got this awesome idea to create a beautiful, glowing lamp with your own hands, but you're not sure where to start. Well, a mosaic lamp kit is like your perfect, ready-to-assemble creative buddy!
These kits are specifically designed to help you craft a stunning glass-tiled lamp, piece by colorful piece. Think of it like a really fun, grown-up puzzle that turns into a gorgeous piece of home decor!
Typically, when you open up a mosaic lamp kit, you'll find everything you need to get started, all neatly packed inside:
-
A beautiful glass mosaic shade: This is the main part where all your colorful pieces will go!
-
A sturdy mosaic lamp base: This is the foundation that will hold your glowing creation steady.
-
All the electrical fittings: Don't worry, these are usually super easy to put together! You'll get the bulb holder, the cord, and the plug, so your lamp can light up your world.
-
Grout or adhesive: These are the magical ingredients that hold all your tiny glass pieces in place and finish off your mosaic beautifully.
-
Step-by-step instructions: These kits come with clear, easy-to-follow guides, so you're never left guessing. It's like having a friendly teacher right there with you!
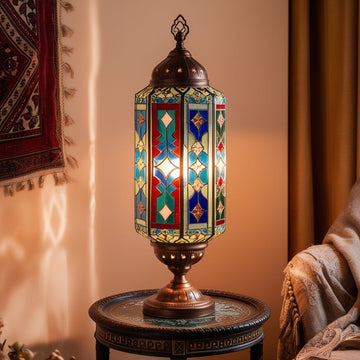
What's really cool is that some of these kits are specifically labeled as Turkish lamp kits. This means that the glass pieces and the patterns you create will follow those gorgeous, traditional Ottoman designs. With components like authentic Turkish lamp parts, you're not just building a lamp; you're bringing a truly cultural vibe and a touch of ancient artistry right into your home. It's like capturing a piece of history and making it glow.

2. Why Choose a Turkish Lamp Kit?
Alright, let's chat about why picking a Turkish option for your mosaic lamp kit is just an absolutely brilliant idea! There are some really compelling reasons that make these kits stand out, especially if you're looking for that perfect blend of artistry and fun.
Here's why you'll love it:
-
Cultural charm: Imagine bringing a little piece of that ancient, beautiful artistry right into your home! The classic mosaic patterns you find in these kits are truly captivating. It's like having a little taste of Istanbul's vibrant history and artistic tradition, all glowing beautifully in your own space.
-
Complete components: You know how sometimes you start a DIY project and realize you're missing a crucial piece? Not with a full Turkish lamp kit! These kits are fantastic because they make sure you have absolutely everything you need. This includes all the genuine Turkish lamp parts, designed to fit together perfectly, so your crafting journey is smooth and enjoyable from start to finish.
-
Creative satisfaction: Oh, this is the best part! Once you've meticulously assembled your lamp, placing each colorful piece, there's this incredible feeling of pride and satisfaction. Your lamp will glow with not just light and colors, but with your effort and patience. It's like seeing your hard work literally light up the room – a perfect, shining reward for your patience and creativity!
So, if you're truly looking for authenticity in your craft and a project that's wonderfully easy to put together, choosing a Turkish option for your mosaic lamp kit is your absolute best starting point. It's an experience that combines beauty, tradition, and personal achievement!
3. How to Choose the Right Mosaic Lamp Base
Alright, let's talk about something super important for your glowing masterpiece: picking the perfect mosaic lamp base! You know, it's like choosing the right shoes for an amazing outfit – the base determines both the stability and the overall style of your beautiful lamp. You want it to be just right, don't you?
Here’s what to look for when you're picking out that crucial part of your mosaic lamp kit:
-
Material Matters: Think about the vibe of the room where your lamp will shine. Do you want something sleek and modern? Maybe a cool metal base would be perfect! Or perhaps your space has a warm, earthy feel? Then a beautiful wood or ceramic base could be just the ticket. It's all about making sure your lamp fits right in with your home decor.
-
Height & Width: Finding the Perfect Balance: This is pretty important for how your finished lamp will look. You want to make sure the base is the right height and width to balance perfectly with the glass shade you'll be creating. A base that's too small might make the lamp look top-heavy, and one that's too big could overwhelm your lovely mosaic. It's like finding that sweet spot where everything looks harmonious!
-
Electrical Fit: Safety First, Style Second! Last but definitely not least, double-check that the lamp base you choose supports standard cords and bulbs. Safety is always a top priority, and you want to make sure your beautiful creation will light up properly and safely.
By taking a little extra time to pick the right base first, your completed mosaic lamp will not only be super safe and stable, but it will also be truly stunning – a shining example of your creativity and a gorgeous addition to your home! It's like laying the perfect foundation for a beautiful piece of art.

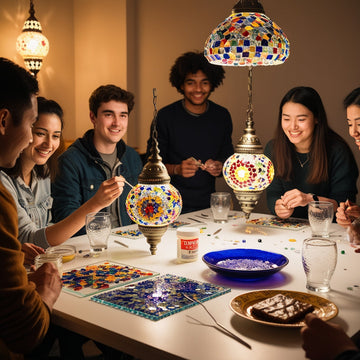
4. Step‑by‑Step Guide: Assembling Your Mosaic Lamp Kit
Alright, fantastic news for all you creative souls out there! You absolutely do not need to be a craft expert with years of experience to make one of these stunning lamps. Seriously, leave those worries at the door! Here’s a super simplified, step-by-step plan that makes creating your very own mosaic lamp with a mosaic lamp kit an absolute breeze:
-
Unbox and Check Contents: First things first, carefully unbox your mosaic lamp kit and give all the goodies a quick check. This just confirms that your kit includes all the beautiful Turkish lamp parts, from the gorgeous shade to the tiny bulb holder. It’s like making sure you have all the ingredients before you start baking a cake!
-
Prepare Your Workspace: Next up, protect your creative zone! Lay down some newspaper or a plastic sheet to catch any little bits of grout or adhesive. This makes cleanup super easy later – a happy workspace makes a happy crafter!
-
Test-Fit Glass Pieces: This is where the fun really begins! Before you grab any glue, take your colorful glass pieces and 'test-fit' them onto the glass shade. This helps you get a feel for your pattern and placement. It’s like doing a dry run before the big show!
-
Apply Adhesive: Now, carefully glue each tiny mosaic piece onto the shade. Take your time here; precision makes the magic happen!
-
Let It Dry: Patience, my friend, is a virtue! Let your masterpiece dry completely. This crucial step ensures that all your hard work is locked in, guaranteeing long-lasting, beautiful results.
-
Grout Your Design: Once the adhesive is dry, it’s time to grout your design. This fills the tiny gaps between your glass pieces and really makes your pattern pop! It’s like the frame that brings a painting to life.
-
Clean Excess Grout: Use damp cloths to carefully clean away any excess grout. This prevents a cloudy haze and reveals the true sparkle of your mosaic!
-
Assemble Shade to Base: Follow the easy instructions included with your mosaic lamp kit to securely attach your beautiful handmade mosaic lamp shade to its mosaic lamp base. It’s like putting the final puzzle pieces together!
-
Insert Bulb, Plug In, and Test: Last but not least, pop in the bulb, plug in your creation, and witness the magic! Enjoy your handcrafted glow – it’s a moment of pure pride and accomplishment, right here on this lovely Friday afternoon in Kırşehir!
Because each step is so clear, simple, and thoughtfully spaced out, the assembly process feels genuinely fun and exciting, never overwhelming. It’s a rewarding journey from start to finish!
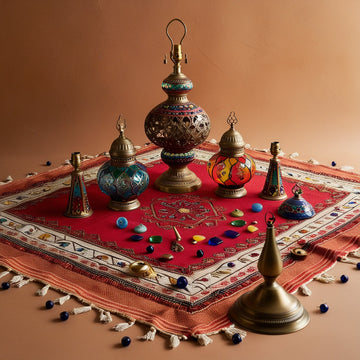
5. Common Turkish Lamp Parts Explained
Understanding parts helps avoid frustration. Typical Turkish lamp parts you’ll find:
-
Ceramic fitting – for bulb holder stability.
-
Metal collar/nut – secures shade to base.
-
Electrical wire & plug – usually pre‑attached; check for regional compatibility.
-
Glass shade – the colorful heart of your Turkish lamp kits.
-
Base components – bolt, washer, and stand platform.
Knowing each part helps you handle the mosaic lamp kit with confidence.
6. Tips for Glowing Results
Alright, you've put your heart and soul into creating your beautiful mosaic lamp, and now you want to make sure it keeps shining bright for years to come, right? Think of these tips as giving your glowing masterpiece a little spa treatment to keep it looking its absolute best!
Here's how to ensure your lamp shines bright:
-
Glove Up for Grouting! When you're working with grout, it can get a little messy. So, grab some gloves! This isn't just about keeping your hands clean; it's also about avoiding any smudges on your beautiful glass pieces. It's like putting on a chef's hat before cooking – it helps keep everything tidy!
-
LED Bulbs are Your Lamp's Best Friend! When it's time to choose a bulb for your lamp, go for LED! These bulbs are super cool because they emit less heat. This is important because less heat means better protection for your gorgeous glass pieces and the overall structure of your lamp. It's like choosing a cool, gentle light that keeps your artwork safe.
-
Clean Regularly, but Gently! Just like you'd dust your favorite furniture, your mosaic lamp loves a gentle clean. Use a soft microfiber cloth for regular dusting. Avoid anything abrasive that could scratch your delicate glass. It's all about showing your lamp a little love and care!
-
Avoid Spills – Keep it Sparkling! Try to keep your lamp away from spills, especially harsh chemicals. Mosaic surfaces can dull or get damaged from strong cleaners. If something does spill, wipe it up quickly and gently. It's like protecting a beautiful painting – you want to keep it pristine!
By keeping these friendly tips in mind, you'll protect both your stunning glass art and the sturdy mosaic lamp base. Your handcrafted lamp will continue to cast its beautiful, colorful glow, creating a unique ambiance in your space for many years to come!

7. Why zenmosaicstudio.com Is Your Go‑To Shop
At Zen Mosaic Studio you’ll find:
-
A wide range of authentic Turkish lamp kits
-
Competitive options for mosaic lamp bases
-
Full sets of Turkish lamp parts, ready to assemble
-
TUTORIALS and workshops guiding your craft
-
Fast and secure shipping across the US
Moreover, our kits are page‑speed optimized and mobile‑friendly—because convenience matters. Whether you're ordering on a desktop or phone, our site delivers smoothly.
8. Advanced Projects with Turkish Lamp Kits
Once you’ve mastered the basic kit:
-
Try multi‑shade lamps — combine several glass shades on one tall base.
-
Mix custom glass colors — create a pattern that reflects your personality.
-
Add bronze patina to your mosaic lamp base for vintage atmosphere.
-
Join our lamp making classes via Zen Mosaic Studio to refine your technique.
Thus, once you start, you’ll find endless creative possibilities!
9. FAQ
Q: Can I replace the bulb with brighter LEDs?
Yes! Just make sure it's within shade wattage limits and emits low heat.
Q: Are parts interchangeable?
Some are. For example, shade-to-base fittings tend to be standard, but glass shades are size‑specific.
Q: How long drying takes?
Glue: 24 hrs. Grout: 48 hrs before the first switch‑on. Always check manufacturer's instructions.
Q: Can kids help?
Kids can help with inlay and grouting—but adult supervision is needed for electrical assembly.
10. Mosaic Lamp Kit
To wrap up, my fellow creative adventurers, let's bring it all together! You know, embarking on the journey with a mosaic lamp kit is truly special – it's like weaving a little bit of art and light directly into your everyday life.
Think about it:
-
A mosaic lamp kit brings the joy of creation right to your fingertips, transforming tiny pieces into something spectacular.
-
Choosing a Turkish lamp kit means you’re embracing a piece of genuine cultural artistry. It ensures authenticity, bringing traditional beauty right into your home.
-
A durable mosaic lamp base is like the strong foundation for your glowing masterpiece, supporting your beautiful, illuminated shade. It’s built to last!
-
Quality Turkish lamp parts are key – they make the assembly process smooth, fun, and so much easier. No frustration, just pure enjoyment!
And guess what? Zen Mosaic Studio is here to be your ultimate guide and supply shop! We offer absolutely everything you need for this magical journey – from the perfect kits and essential parts to friendly support and endless inspiration. We're like your creative lighthouse, guiding you every step of the way!
So, are you ready to embark on this sparkling adventure? Don't wait another moment! Visit our collection and order your mosaic lamp kit today at zenmosaicstudio.com. It's time to unleash your creativity, let your imagination soar, and literally let your artistry shine!